Want to give a try at making your own mixed media collages but have questions? This guest blog post by cow art collage artist
Elizabeth St. Hilaire Nelson discusses some of her strategies and techniques when it comes to making a one-of-a-kind collage.
Why Paint Your Own Collage Papers?In the beginning, I used art store purchased papers in my collage work. I found the most richly colored, textured, patterned papers in the art store and I collected and coveted them on every trip I took. On a trip to New York City I must have spent over $100 on sheets of luxuriously colored papers at the store Kate’s Paper.
What happened next was sad, but true. Most art store papers fade! These papers are possibly colored with dye and not pure pigment (the color that is the base of all fine art paints and pastels). Dye fades over time, depending on its exposure to sunlight. It will break your heart to see a collage fading right in front of you, little by little, as the years go by. At first you might not even notice it, until you look back at a photo of the work on a note card or on your website, and all of a sudden you realize that your original just does not look as vibrant as it used to.
To combat this dilemma, I started painting my own papers. I use Golden Artist Colors Fluid Acrylic paints, they are lightfast (resistant to fading) professional paints. Painting my own papers offered me a whole new world of possibilities of color, a perfect paper palette.
Papers for PaintingThese acid-free Oriental papers are strong and absorbent. They are made in the centuries-old Japanese tradition. They are white and natural tones which make an excellent base for creating your own brilliantly colored collage papers. All are available at DickBlick.com
- Hosho — Hosho is a traditional kozo (mulberry fiber) paper that doesn’t shrink or tear easily, making it ideal for woodblock or line printing. Hosho paper is sized.
- Kozo — Kozo rice paper is highly absorbent, making it ideal for calligraphy and watercolor painting. Kozo paper is not sized.
- Unryu — Unryu rice paper has been used for centuries in Japan for creating Shoji screens and is extremely strong, thanks to molded-in fibers. It’s excellent for calligraphy, sumi-e, watercolors. Unryu paper is not sized.
- Ricer Paper Sheets — Hanshi Japanese rice paper for brush writing or calligraphy is mouldmade in the centuries-old Japanese tradition makes excellent base for fluid acrylics, available in sheets if you prefer, versus a roll.
- Assorted Japanese Sheets — You may purchase a 10-sheet assortment of fine Japanese papers from DickBlick.com. This assortment includes two full sheets of Chiri (sized), Okawara (sized), Unryu (not sized), Kitakata (sized), and Mulberry (not sized). A nice way to experiment and find which papers work best for you.
- Thai Unryu — Long, swirling strands of kozo provide contrast and texture in these traditional style unryu papers. Lightweight and translucent, choose from a range of natural tones, perfect for painting your own colors, textures, and patterns.
Techniques for Painting PapersEvery couple of months I pull out the paints, a large sheet of plexiglass, paint brushes, and I make myself a batch of custom colored collage papers. My friend and fellow collage artist Jo suggested that I try fluid acrylics, since they retain their intensity when watered down. I said to her, “Jo, are they REALLY better? Because they are REALLY expensive.” Well she said “YES” and I took her advice, guess what?
They are REALLY GREAT!
You can dilute fluid acrylics, spatter, splash, blot into them, and they stay very intense in their color. It’s usually quite warm in Florida, with a mild breeze, this is perfect weather for letting the papers dry on the grass outside the studio, if need be you can also let the papers dry indoors on plastic trash bags. There is a table in my studio covered with a large sheet of plexiglass for monoprinting. I learned the hard way that if you let the paper dry directly on the plexi, it sticks. Transfering the painted papers to trash bags allows them to be easily peeled off when dry. This process can also create some interesting effects from the crinkle pattern of the bag.
Beyond just tinting collage papers with fluid acrylics, I have developed some interesting techniques. To achieve texture and variety of colors, I spatter, dry brush, and monoprint.
I start with Japanese Washi paper (white rice paper, very absorbent) and natural tone art store papers. The art store paper offers textures and a variety of thickness. I also often buy art papers with some printing on them (and or glitter in them) that will show through the fluid acrylic applicationthis offers nice effect. I also paint my kids’ old workbook pages, as well as old book pages from used book stores, maps, old check registers, addressed envelopes, anything I can imagine would make good collage material.
 Blotting
The sheets of paper shown here are an example of the blotting technique. This is white Washi paper purchased on a roll. I tear off a sheet and keep it on hand to “blot” the excess drips and globs of paint from the plexiglass between painting other sheets! Let nothing go to waste. I can also enhance the blotting feeling of this paper by spattering some paint directly on to the plexiglass and then blotting the Washi into it. Not only does this technique clean your work surface by absorbing all the leftover paint, it also makes for some wonderful collage paper when you get the color combinations right!
 Monoprinting
For a monoprint, I create a pattern with the brush and fluid or full-body acrylics, painted directly onto the plexiglass surface. Then, I press the paper into the paint and pull a print. This process is very good for showing brush texture and interesting patterns.
You can monoprint first on white paper, let that dry, and paint over it with watered down fluid acrylic so that the monoprint shows through. Alternately, you can paint the paper a solid shade first, let it dry, and then monoprint a complimentary color in heavy body or fluid acrylic.
Experimentation is the name of the game. Using colors that sit next to each other on the color wheel, or analogous colors, look pleasing together because they are closely related. Orange, yellow-orange, and yellow are an example of analogous colors. Sunflowers by Vincent Van Gogh is an example of a painting that utilizes this type of color palette.
 Dry Brushing
At left is a nice example of the dry brush technique. First, I took this sheet of art paper and dry brushed dark green onto it with a dry brush dipped very lightly in fluid acrylics, I zipped the brush lightly across the sheet without much pressure. The nature of this paper is very absorbent, so the ink sinks right in and does not spread much.
Next, after letting the paper dry in the sun for about 10 minutes, I took the paper back into the studio and mixed up some lime green (an analogous color on the color wheel) with much water so that it was very translucent. I quickly and completely brushed this color over the top of the dark green dry brushing, to cover all of this heavy art paper.
The effect is a nice green toned paper with much texture that would be very good for grass or tree leaves.
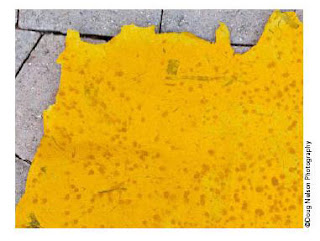 Spattering
Take this outside, I learned the hard way what a mess it is if you don’t! You may use a toothbrush and run your thumb across it for a more fine spatter, or shake a large brush full of diluted fluid acrylics for a bold spatter. If you work “wet in wet” (spray down your paper first with a water mist bottle) spatter droplets of diluted paint onto wet paper, they will bleed and spread nicely. If you work dry, you will get a totally different effect, spots with defined edges.


