The blog providing "behind the scenes" information to the art found on www.cowartandmore.com. This blog is maintained by gallery owner and cattle veterinarian, Kathy Swift
Wednesday, December 14, 2011
Polishing silver cow jewelry
In getting ready for the Cow Art and More booth at the National Holstein Convention this June, I decided a jewelry inventory was in order. In doing so, I had some dairy cow jewelry pieces that needed polishing.
Metal doesn't want to be shiny. If silver had its choice, it will be a dull flat gray color. We jewelry folks give that bright shine that is so appealing. This is a group of cows that have been polished (foreground) and another group that need polishing (small pile to the upper left of the picture). Before polishing, I coat all of the pieces with a black patina (stain). This will buff off easily, except in the cracks and crevices. This is actually what I want, since that dark patina will highlight some of the subtle details of the cow charm.
The cow to the far left has the black patina, but has not been polished. The one on the right of the picture has been polished.
There's a couple different ways of doing this, but this time, I'm using a flex shaft tool with a buff and red rouge polishing compound. While spinning the buff, I dip it into the red rouge (the mostly hard brick in the right part of the picture), then press the buff onto different areas of the cow charm.
In case you're thinking this looks like your dentist's office, you're pretty much right. Just imagine the higienist polishing your teeth with that minty toothpaste, except I'm using polishing compound on metal.
It leaves a dark red residue on my hands and fingers, which mostly comes off with soap and water. It does get into the cracks of your hands and fingernails though, so people will wonder if you have some strange incurable fungus or something similar.
When I'm done polishing, I use Dawn dish soap to get the greasy compound off. I dry them thoroughly, then they're ready to go!
Monday, December 12, 2011
Monday's agriculture website - Christmas Tree facts
Thursday, December 1, 2011
Packing cow jewelry for shipping
Wednesday, November 23, 2011
Thanksgiving blessings and #foodthanks
1. Thank you to all the farmers that work 24/7/365. Farming isn't a job, it's a lifestyle. You make many sacrifices to make sure others can have food to eat.
2. Thank you to all those who choose to work in a place to allow me to get this food. Whether you're a trucker, grocer, or processor, thank you for helping to bring food to my table.
3. Thank you to the charities and organizations that make sure people around the world can avoid hunger.
4. Thank you to the people who teach others how to use food to their advantage by improving their health and well being.
5. Thank you for those that choose to make preparing food your profession, especially when you're one of my favorite eateries.
6. Thank you for those involved to help me get some of my favorite can't live without foods: any dairy product, coffee, chocolate, wine, fresh herbs, garlic, ripe tomatoes, and a really good filet.
7. Thanks to those who are producing technology to help provide food security for those around the world.
8. Thank you to wineries and Food Network television (and magazine!) for helping me to appreciate the art of food. (Everything involving the 'art of food' has quickly become one of my favorite ways to spend time with my family.)
9. Thank you to those who lose sleep over keeping our food supply safe.
10. Thank you to the local farmers who sell at farmers' markets. Those relationships are such a wonderful things to have.
What are you giving #foodthanks for today?
Monday, November 21, 2011
Monday's agriculture website - #foodthanks
Those people deserve our thanks, especially during the Thanksgiving holiday. Please remember to give #foodthanks this week on your blog, facebook pages, and twitter, especially on Wednesday, November 23. (Learn more at the official Foodthanks website.)
I want to take the opportunity to personally thank each and every person for helping to provide the food myself and my family will consume for our Thanksgiving meal. I know there are a lot of hands involved and my thanks go to every one of you. Thank you for providing a safe, affordable, nutritious product. I am also proud of the small role I play in helping to bring food to the table of many families. It makes me proud to say that I help farmers take care of their animals so they can feed people.
Regardless of who produced your food or how it got to you, I hope we can agree that they all deserve our thanks. As you sit down for your Thanksgiving meal this week, please remember to give #foodthanks.
P.S. For those of you on twitter, #foodthanks is the hashtag to express your gratitude there as well.
Thursday, November 17, 2011
Getting cow art ready for holiday sales
Our postcard mailing is going to the post office today. (Thanks to hubby for taking it there for me.) We send out our postcards bulk mail, so we have to address and organize them before they go.
You can't be ready to ship anything out without having plenty of shipping containers. Our items go out in either padded envelopes or cardboard boxes of some kind. (We also try to recycle and reuse boxes when possible.)
When shipments go out from the Cow Art and More office, we send them with a package tracking number. Customers can easily track their packages through the appropriate website (USPS, UPS or FedEx) (By the way, we don't send them smudged either -- but I didn't want to violate anyone's privacy by sharing package shipping information.)
And yes, we do have print catalogs! It's an abbreviated version of our online catalog and generally only includes our best sellers. If you have online access, going to the Cow Art and More website is still the way to go, but for those with dial up internet or no internet at all (gasp!), we are happy to mail a catalog.
What are you doing to get ready for the holidays?
Wednesday, November 16, 2011
How to paint your own collage papers
Why Paint Your Own Collage Papers?
In the beginning, I used art store purchased papers in my collage work. I found the most richly colored, textured, patterned papers in the art store and I collected and coveted them on every trip I took. On a trip to New York City I must have spent over $100 on sheets of luxuriously colored papers at the store Kate’s Paper.
What happened next was sad, but true. Most art store papers fade! These papers are possibly colored with dye and not pure pigment (the color that is the base of all fine art paints and pastels). Dye fades over time, depending on its exposure to sunlight. It will break your heart to see a collage fading right in front of you, little by little, as the years go by. At first you might not even notice it, until you look back at a photo of the work on a note card or on your website, and all of a sudden you realize that your original just does not look as vibrant as it used to.
To combat this dilemma, I started painting my own papers. I use Golden Artist Colors Fluid Acrylic paints, they are lightfast (resistant to fading) professional paints. Painting my own papers offered me a whole new world of possibilities of color, a perfect paper palette.
Papers for Painting
These acid-free Oriental papers are strong and absorbent. They are made in the centuries-old Japanese tradition. They are white and natural tones which make an excellent base for creating your own brilliantly colored collage papers. All are available at DickBlick.com
- Hosho — Hosho is a traditional kozo (mulberry fiber) paper that doesn’t shrink or tear easily, making it ideal for woodblock or line printing. Hosho paper is sized.
- Kozo — Kozo rice paper is highly absorbent, making it ideal for calligraphy and watercolor painting. Kozo paper is not sized.
- Unryu — Unryu rice paper has been used for centuries in Japan for creating Shoji screens and is extremely strong, thanks to molded-in fibers. It’s excellent for calligraphy, sumi-e, watercolors. Unryu paper is not sized.
- Ricer Paper Sheets — Hanshi Japanese rice paper for brush writing or calligraphy is mouldmade in the centuries-old Japanese tradition makes excellent base for fluid acrylics, available in sheets if you prefer, versus a roll.
- Assorted Japanese Sheets — You may purchase a 10-sheet assortment of fine Japanese papers from DickBlick.com. This assortment includes two full sheets of Chiri (sized), Okawara (sized), Unryu (not sized), Kitakata (sized), and Mulberry (not sized). A nice way to experiment and find which papers work best for you.
- Thai Unryu — Long, swirling strands of kozo provide contrast and texture in these traditional style unryu papers. Lightweight and translucent, choose from a range of natural tones, perfect for painting your own colors, textures, and patterns.
Techniques for Painting Papers
Every couple of months I pull out the paints, a large sheet of plexiglass, paint brushes, and I make myself a batch of custom colored collage papers. My friend and fellow collage artist Jo suggested that I try fluid acrylics, since they retain their intensity when watered down. I said to her, “Jo, are they REALLY better? Because they are REALLY expensive.” Well she said “YES” and I took her advice, guess what?
They are REALLY GREAT!
You can dilute fluid acrylics, spatter, splash, blot into them, and they stay very intense in their color. It’s usually quite warm in Florida, with a mild breeze, this is perfect weather for letting the papers dry on the grass outside the studio, if need be you can also let the papers dry indoors on plastic trash bags. There is a table in my studio covered with a large sheet of plexiglass for monoprinting. I learned the hard way that if you let the paper dry directly on the plexi, it sticks. Transfering the painted papers to trash bags allows them to be easily peeled off when dry. This process can also create some interesting effects from the crinkle pattern of the bag.
Beyond just tinting collage papers with fluid acrylics, I have developed some interesting techniques. To achieve texture and variety of colors, I spatter, dry brush, and monoprint.
I start with Japanese Washi paper (white rice paper, very absorbent) and natural tone art store papers. The art store paper offers textures and a variety of thickness. I also often buy art papers with some printing on them (and or glitter in them) that will show through the fluid acrylic applicationthis offers nice effect. I also paint my kids’ old workbook pages, as well as old book pages from used book stores, maps, old check registers, addressed envelopes, anything I can imagine would make good collage material.
Blotting
The sheets of paper shown here are an example of the blotting technique. This is white Washi paper purchased on a roll. I tear off a sheet and keep it on hand to “blot” the excess drips and globs of paint from the plexiglass between painting other sheets! Let nothing go to waste. I can also enhance the blotting feeling of this paper by spattering some paint directly on to the plexiglass and then blotting the Washi into it. Not only does this technique clean your work surface by absorbing all the leftover paint, it also makes for some wonderful collage paper when you get the color combinations right!
Monoprinting
For a monoprint, I create a pattern with the brush and fluid or full-body acrylics, painted directly onto the plexiglass surface. Then, I press the paper into the paint and pull a print. This process is very good for showing brush texture and interesting patterns.
You can monoprint first on white paper, let that dry, and paint over it with watered down fluid acrylic so that the monoprint shows through. Alternately, you can paint the paper a solid shade first, let it dry, and then monoprint a complimentary color in heavy body or fluid acrylic.
Experimentation is the name of the game. Using colors that sit next to each other on the color wheel, or analogous colors, look pleasing together because they are closely related. Orange, yellow-orange, and yellow are an example of analogous colors. Sunflowers by Vincent Van Gogh is an example of a painting that utilizes this type of color palette.
Dry Brushing
At left is a nice example of the dry brush technique. First, I took this sheet of art paper and dry brushed dark green onto it with a dry brush dipped very lightly in fluid acrylics, I zipped the brush lightly across the sheet without much pressure. The nature of this paper is very absorbent, so the ink sinks right in and does not spread much.
Next, after letting the paper dry in the sun for about 10 minutes, I took the paper back into the studio and mixed up some lime green (an analogous color on the color wheel) with much water so that it was very translucent. I quickly and completely brushed this color over the top of the dark green dry brushing, to cover all of this heavy art paper.
The effect is a nice green toned paper with much texture that would be very good for grass or tree leaves.
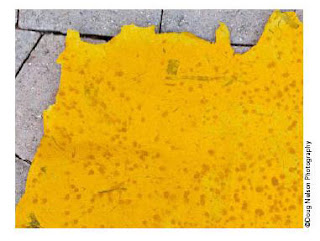
Spattering
Take this outside, I learned the hard way what a mess it is if you don’t! You may use a toothbrush and run your thumb across it for a more fine spatter, or shake a large brush full of diluted fluid acrylics for a bold spatter. If you work “wet in wet” (spray down your paper first with a water mist bottle) spatter droplets of diluted paint onto wet paper, they will bleed and spread nicely. If you work dry, you will get a totally different effect, spots with defined edges.
Friday, November 11, 2011
How to keep sterling silver jewelry free of tarnish
1. The first thing you need to know is that "tarnish happens" when it comes to jewelry. Even gold jewelry, after many years, will eventually tarnish. Tarnish is caused by the reaction of the copper, in the sterling silver or gold, to humidity and elements. Even perfumes, lotions, hair care products and sweat will accelerate tarnish on jewelry.
The remedy: Try to make sure all your "body products" (hairspray, lotions, etc.) are dry before putting on your jewelry. After you are done wearing your jewelry, wipe it clean and dry with a soft cloth (I prefer plush cotton or flannel) before storing it.
2. Leave jewelry sitting out, exposed to the air most of the time, tarnish becomes inevitable.
The remedy: Store jewelry in a place that is cool, dark and not exposed to air. Other jewelers advocate placing jewelry in a ziploc bag for storage. You must make sure your jewelry is absolutely dry and the bag is free of air when doing this. Otherwise, you create a "rainforest" in the bag and it will tarnish in a matter of days! If you want to do this, I would recommend wrapping the piece in a soft cloth first, then place in a ziploc bag. Squeeze all the air out of the bag before closing. For those that like having their jewelry in a box where you can easily see it, place a piece of chalk in the box. The chalk will absorb the moisture. Be sure to replace the chalk monthly.
3. My jewelry is tarnished. What is the best way to clean it?
The remedy: Always opt first for a polishing cloth to remove tarnish from your jewelry. I sell and recommend the Sunshine polishing cloths, but have also had good luck with Haggerty's silversmith polish sprayed on a soft cloth. (Do not spray this product directly on the piece.) Sometimes I will use the tarnish removing dip to clean a piece, but ONLY if the piece is metal only (no stones) and if there is no "patina" on the piece. (Patina is the intentional oxidation of the piece to highlight details.) These dips mush be used with care as they are removing the outer layer of metal on a piece (like the cloths) and can act very quickly!
4. I use a tarnish removing dip cleaner for my silver and now it tarnishes so much faster. Why is it doing this?
The remedy: While the liquid dips that remove tarnish will do so, they leave a sulfur residue that makes the jewelry react with the air and tarnish more quickly than before. If you are going to use the silver dip, the jewelry must be rinsed for a minimum of 15 minutes under running water to remove all the sulfur residue.
5. Someone told me to use toothpaste and/or baking soda to clean my jewelry. Is this okay?
The remedy: Using either of these is only okay only IF the sterling silver has a matte finish. If the jewelry has a shiny, mirror polish to it, these abrasives will remove the tarnish but will also scratch that shiny finish. Should this happen, they only way to remedy the situation is to have a professional properly polish the piece again, assuming the damage isn't too great.
6. What about ultrasonic jewelry cleaning?
The remedy: This is only an option for pure metal jewelry (no stones) or jewelry with stones hard enough to withstand ultrasonic cleaning. Stones such as coral, turquoise, tanzanite, and others are not ultrasonic cleanable. When in doubt, please consult the designer of the piece or a jewelry repair expert.
Learn more about caring for art and jewelry on the Cow Art and More art resources page.
Thursday, November 10, 2011
You put your arm where???
Sometimes you have to be mental to do this job
I love being a cattle veterinarian, I really do. But sometimes explaining some of what I do to non-agricultural people makes them ask , "You like doing that?" (referring to the long, hot, dirty, and eventually stinky days I endure.) Case in point, in order for me to diagnose a cow pregnant, I have to do a rectal exam. That involves sticking my hand and most of my arm up her rectum to feel her uterus to look for a baby. Invariably, I get some strange looks as people try to assess my mental status and guess whether or not my fingernails are clean. I suppose when you take that procedure out of context, it does make you wonder why someone would want to spend eight years of school and tens of thousands of dollars to learn how to do this. In the end, I don't mind telling you that I enjoy being a little mental (in a good way) to want to get up and do that on a daily basis. I tell you all this to get to the point of this blog post.
I get lots of correspondence from different companies about their products. They range from pharmaceuticals, feed additives, vaccines, etc. Sometimes companies send me actual samples of their products. One of the latest products I received almost made me giddy.
I got a armpit length glove sample from the Neogen Corporation. This just isn't any glove to use in rectal exams. This is a new to the market "PolyPetite" glove just for women. Woo-hoo! So just what makes this glove so special?
I will quote a few lines from their sales letter: "The sleeve was developed to fit the needs of the growing number of women involved in the veterinary care of large animals. The new sleeve is cut slimmer, especially through the wrist and hand area. Women shouldn't have to use sleeves designed for men, and give up the comfort and feel of a sleeve that fits."
Wow! And it's "girly-girl" pink. The cows will love that.
Friday, November 4, 2011
Friday's art article - Cow Parade Austin
Can't make the auction and missed the cows live? No worries! Pictures of the Cow Parade Austin cows can be viewed online, along with creating artist information.
Thursday, November 3, 2011
Giving Thanks for your favorite charity
Cow Art and More will give a silver jewelry charm each to three worthy charities to include in their fundraising activities. We know that many groups have yearly auctions and/or raffles and work very hard to find donations for these events. We want to help.
- Please send an email to info@cowartandmore.com with a brief description of your group and what you will do with the charm.
- Explain what the donation proceeds will help you do and include a picture if you can. The responses will be included on our Facebook fan page.
- The three winners will be announced Thanksgiving Day. (By the way, you can encourage your friends to comment on our Facebook page to help plead your cause!)
Thank YOU for the opportunity and we look forward to helping others this month.
Wednesday, November 2, 2011
Cow jewelry on Cow Art and More
Monday, October 31, 2011
Monday's agriculture website - American Sheep Industry Association
From the domestic and international promotion of wool and pelts to its work on legislative, science and technology, animal health and resource management issues, ASI is a producer-powered federation of state organizations dedicated to the common goal of promoting the profitability and well-being of the U.S. sheep industry. The goals of the organization include developing an industry vision, advocating public policy to protect, promote and support the economical viability of the sheep industry, creating strong national and international markets for wool, advancing and coordinating the science and technology of sheep production, and promoting communication and cooperation between all segments of the industry, related business and government agencies.
Friday, October 28, 2011
Friday's art article - common metals used in jewelry
Sterling silver: Contains 92.5 percent silver and 7.5 percent copper. The copper hardens the overall piece making it 'dent' and mark resistant, but the copper in the metal will react with the oxygen in the air. This results in the dreaded tarnish that eventually forms. (There are ways to avoid tarnish on silver jewelry.) This jewelry is stamped as 'sterling' or .925
Fine silver: This is 100 percent pure silver. This isn't used much in jewelry that is cast (like the cow jewelry charms), but I have used this when making granulation jewelry. Fine silver is softer than sterling silver. This silver may also be stamped as 'fine silver' or .999
Argentium silver: This contains the 92.5 percent silver, but some of the copper has been replaced with germanium. This silver is more resistant to tarnish than sterling silver, but is also more expensive. Currently, argentium silver doesn't have its own 'stamp', so pieces made with this type of metal will be called sterling silver.
24 karat yellow gold: Pure gold. Very soft and not typically used by itself as jewelry. Also referred to as fine gold. Will be stamped as 'fine gold' or .999
10 karat, 14 karat, 18 karat, and 22 karat gold: Refer to how many parts of the 24 karats that contain gold. The higher the karat number, the more parts of gold in the resulting piece of jewelry. The other metals included in this jewelry are typically silver, copper, nickel and/or palladium. When pricing these items, the price generally fluctuates with the amount of gold in the piece (i.e. 18 karat gold jewelry costs more than 14 karat gold jewelry). The higher amount of gold, the more of a yellow appearance to the piece, but the piece will be softer and less 'dent' resistant. This jewelry is stamped as the appropriate number and K. (e.g. 14K)
White gold: This is yellow gold that is combined with either nickel or palladium to give it a white appearance.
Rose gold: This is yellow gold that has a higher percentage of copper to give it a 'blush' appearance.
Green gold: Yellow gold that is alloyed with silver only. The final gold has a yellow-green appearance.
Blue/purple gold: Gold that has been alloyed with iron or aluminum. Very difficult to work with after creation and rarely used.
Plated jewelry: This jewelry is made with a more inexpensive metal, usually silver or bronze, then coated with a more expensive metal. The metal is plated by using chemical or electrochemical means.
Gold filled jewelry: This is a process where a solid layer of gold is bonded to a base metal (usually brass) using heat and pressure. The layer of gold is thousands of times thicker than the layer of gold in gold plated jewelry and much more resistant to wear. This process has recently become available for sterling silver as well.
So how do you know what you have?
Look for a stamp in the back or inside of the piece.
What if there is no stamp? How do I know?
The rules requiring jewelers to place stamps on their products are a bit unclear. We don't have to put on the stamps, especially if we are small production companies (like myself). I choose not to stamp the charms because on many of them, I can't stamp them without detracting from the piece. My advice: if you ever have any questions, ask the person you're buying your jewelry from. If that person isn't available (you're rummaging through an estate sale or got something as a gift) some jewelry repair shops also have commercial kits (using chemicals) that can tell you what your piece of jewelry is made from.
Thursday, October 27, 2011
Cow Art and More Oct e-news
Looking for advice on how to pick the right glass for a picture frame? Need a link to print your own Halloween candy bar wrappers? Missed the news about the two new artists we added to our gallery? Check out the October edition of the Cow Art and More e-news. (And by the way, it's free!)
Monday, October 24, 2011
What is #FoodDay to you?
I want to hear what you have to say about your food! Leave a comment below in the comment box or link to a blog or facebook post you might want to share. Let me hear about what food and/or real food means to you.
(By the way, I wrote about this topic last week about a veterinarian's role in food production.)
Tuesday, October 18, 2011
Two new painters join Cow Art and More
Laura Carey has lived in Canada all her life. She new painting would be an important part of her life, but had no idea that dairy farming would be as important as well. The dairy cattle on the farm she operates with her husband serve as the inspiration for her paintings.
Narrie Toole hails from New Mexico. While she no longer has cattle of her own, she managed her own herd of beef cattle for many years and exhibited the cattle nationally. Narrie's loose impressionistic style of oil painting captures the attention of collectors worldwide.
You can find the complete collection of both artists work in the painting category along with the new products section through the end of the month.
Monday, October 17, 2011
Monday's agriculture website - Rural Women Rock
What happens when you throw a bunch of women that are every bit 'country' in some way or another? You get the Rural Women Rock! blog. The blog was started by rural Oklahoma flower shop owner Kasse Duffy as a place for rural women across American to share and connect. To take Kasse's words directly from the blog:
"My vision is to be the platform and voice, to share the stories and lifestyles of rural women around the world. If you are a rural woman and you rock, or if your a city gal who loves your rural sisters, join us in this journey. I have a feeling its not going to be a smooth ride all the way, back roads can get messy. Lets roll down our windows, let our hair down, turn the music up, and let it all hang out. I have a feeling its going to be life changing, and so much fun for us to all be in it together."
Whether you are a 'rural' woman or not, readers are encouraged to share and support each other. The community members take turn writing the blog posts and enjoy the friendship of rural life. The journey is just getting started.....
Saturday, October 15, 2011
Veterinarians and food safety #BAD11 #FoodDay
While I normally blog about art and agriculture, I wanted to take the opportunity to join the worldwide blog conversation today about food. It's a great topic for all of us since we all eat, regardless of where it may have come from. In my role as a large animal veterinarian, food safety is a part of my focus in working with farms.
How is a veterinarian involved with the safety of the food you eat?
Here's a little of what I do in my day that helps keep the beef and dairy products you buy safe:
1. Whenever I prescribe ANY medication for use in a food producing animal, I have to include the time that meat or milk products from this animal cannot be used for human consumption. This includes antibiotics, hormones, and other supportive products. (And by the way, those times aren't my best guess. They have been established by the Food and Drug Administration.)
2. I work with my farms on developing plans to control disease and sickness on farms without needing to use antibiotics. This includes using effective vaccine strategies (using the best vaccines at the best times) and the latest in technology to diagnose diseases. This allows me to confirm disease diagnoses quicker and institute strategies to prevent the disease in the first place.
3. I show people where and how to give the medications as to reduce the risk that not only will the medication cause damage to that future piece of steak, but will also stay in the system longer to cause a medication residue.
4. While every antibiotic used in a food producing animal must have a withdrawal time listed, that is simply not enough to be sure everything is 100 percent safe. I have worked with my farm clients to show them how to use on-farm testing methods to make sure animals returning into production are free of antibiotics and can have their products consumed safely.
5. It's important that if I diagnose a disease on a farm that has a human food safety danger (like Salmonella or E. coli), everyone needs to know all precautions that need to be taken to not only stop the spread, but prevent the sickness of people both working on the farm and product consumers.
6. When it comes to looking at a herd of animals, I also find it a part of my job that I identify risks to operations and how to prevent them from causing a food borne illness. For example, as much as wild birds are great to look at, they can be the source of Salmonella outbreaks. We take precautions to keep these animals from mingling in key areas of farm animals.
7. I'm also involved in helping to control diseases of risk to human health that can be passed through the food through government surveillance programs. This includes testing and vaccinating against Brucellosis and testing for Tuberculosis, both of which can be contracted by people who eat infected products from an animal carrying these diseases.
These are just a few of my duties. Some other responsibilities of veterinarians and food safety include:
1. Veterinarians serving as meat inspectors in federally inspected meat processing plants to make sure only healthy animals enter the food supply.
2. Veterinarians in the armed forces inspecting food to make sure it is safe for troops to eat.
3. Veterinarians serving in positions involved with human and public health to investigate food borne illnesses and disease outbreaks potentially coming from an animal source.
I'm proud to be a (small) part of keeping the food on your plate safe and healthy.
Friday, October 14, 2011
Friday's art website - Art Therapy
The American Art Therapy Association (AATA) is an organization of professionals dedicated to the belief that the creative process involved in art making is healing and life enhancing. Its mission is to serve its members and the general public by providing standards of professional competence, and developing and promoting knowledge in, and of, the field of art therapy. The AATA represents approximately 5,000 members and 36 AATA State and Regional Chapters that conduct meetings and activities to promote art therapy on the local level.
Wednesday, October 12, 2011
Zero to chaos in three minutes or less
In my life, it happens when I'm on the phone.
Meet my youngest child.
A serious flirt.
And mischief maker.
And he eats....A LOT. In fact, if you ask him, he will tell you his name is Chunky Monkey.
His father and I are completely prepared to get the phone call from school one day that he has run his underwear up a flagpole.
(And is using his charm and good looks to get out of having to scrub the entire cafeteria floor as his punishment.)
Why am I worried about such things at such a young and sweet and tender age? Because of what he can do with a couple of markers in just three minutes.
Who knew that in the time it takes to take a phone order from a customer that you can paint your hands with a marker.
And if that wasn't enough, he wanted to show me he artistic talent and could use the complimentary color orange on his arms to set off the color purple on his hands. (If you're trying to calculate a score for this masterpiece, using two colors in under three minutes does increase the difficulty factor by 0.3).
So if you ever call to ask a question, place an order, or just otherwise chit-chat, remind me to check on Chunky Monkey and make sure I have all marking elements (including my collection of 64 different colors of Sharpies) in my possession.
(By the way, I can't wait to get a note from school today asking me to keep my child home until his fungus has resolved.)
Monday, October 10, 2011
Monday's agriculture website - Pumpkin Patches
Friday, October 7, 2011
Lost Wax Jewelry Casting Process - How silver jewelry is made
- You start with an original model (either out of wax or a metal model).
- Make a mold of that model.
- Inject that mold with hot wax to make replicas of the model.
- Put all the models onto a 'tree'. The base of the tree is on raised circle called a button.
- Surround the tree with a can and investment (plaster).
- Heat the can and investment so the wax evaporates. Then you are left with a negative space.
- Heat the appropriate amount of metal and fill the negatives space in the tree.
- Dissolve the plaster in water and cut the metal pieces off the tree.
- Finish and polish.
Thursday, October 6, 2011
New LOWER silver cow jewelry prices
Wednesday, October 5, 2011
And the cow art gift certificate winner is....
In case you're curious as to how her name was picked (and want to see the video debut of the official studio cat), you're invited to watch the selection video:
Tuesday, October 4, 2011
Am I superwoman? Hardly.
"How do you get it all done?"
I don't know that I do anything much different from anyone else, but here's my take on how I get things done (outside of my magic wand):
- I don't sleep much. Caffeine and I are close friends, and I don't spend much time with my head on a pillow. While this let's me get a lot done, I am working hard on trying to change this. I have a sneaking suspicion that it's affecting my health in not a good way, so this one has got to get remedied sooner rather than later.
- I don't do anymore housework than absolutely necessary. Not kidding. I do my best to make sure my kids go to school in clean clothes and don't get sick from a food borne illness, but the rest gets done......whenever. My little peeps (or Hurricane three boys as I affectionately refer to them sometimes) can destroy a house in minutes. Seriously. So why spend hours (yes, hours) cleaning up only to have chaos again in a matter of minutes? I have just learned to live with the chaos and not have people over to visit without 3 weeks notice and a cleaning crew scheduled.
- This next one is a biggie. I didn't even realize my advantage here until a couple of years ago. My husband works at the grocery store. I send a list with him every day or two and I almost never have to go. I figure this one saves me three to five hours a week, easy.
- I don't watch much TV. Okay, I do like watching a few shows, but when I do, it's on the DVR or online. Zip through the commercials and that 1 hour show is now down to forty-two minutes (and I'm usually making jewelry while I'm watching).
- I have a great babysitter. She is fantastic at helping to keep my kids in line and fed...and my kids LOVE her. (More than me sometimes as they have been so kind to share as I'm taking away their favorite monster trucks for beating the crap out of each other.)
- I spend every possible moment doing something. This probably isn't quite the best as my brain probably does need some down time, but if I've got a minute, I'm busy. The ten or fifteen minutes I might have waiting on a client or getting to my next destination early is perfect for catching up on blog reading, sending out emails, or returning a few phone calls. And since I also spend a lot of time in a vet truck, I subscribe to some killer business podcasts and listen while driving.
- I have the best, most supportive spouse in the world. Parenting is something we both do. He knows when I'm in my office working that he's in charge. I can't also thank him enough for the help he gives me in the business.
Let me hear from you. What do you do to get through your day?
Monday, October 3, 2011
Monday's agriculture website - Feedyard Foodie
Thursday, September 29, 2011
Cow Art and More September e-news
Wednesday, September 28, 2011
Cow art pictures from Pennsylvania
Anyway....here there are!
We had more of the puzzles with two of the paintings by Robert Duncan. These 1000 piece puzzles are the perfect gift. You can also see some of the Holstein card sets by Robin Pedrero and the iPhone cases by Elizabeth St. Hilaire Nelson.
We also had an assortment of bookmark magnets by Palmetto Cat Designs. In addition to the Holstein bookmarks, we had flowers, flags and chickens.
The nightlights by Spotlight Designs were also a big hit. It's funny to see them be popular with all age groups. Apparently, you're never too old to have a nightlight.
We showed off the stained glass box trophies we did for this year's Red and White Holstein show along with an example of a black and white Holstein piece with colored glass.
Of course we couldn't go to the show without bringing along our favorite accessory: bags! We had tote bags by Elizabeth St. Hilaire Nelson and Valerie D'Ortona. These bags are perfect for the beach or trip to the grocery store.
Of course the weekend wouldn't be complete without some art prints. At left is "Holstein" by Jo Lynch.
Cow Art and More also had prints of the popular "Grazing Beneath a Garnet Sky" by Robin Maria Pedrero.
We had a great weekend and we so excited to meet our many fans! Thank you for the hospitality!